
I still remember the first time I made chocolate cups filled with silky mousse for a family gathering the little ones pressed their faces to the table, the adults stole tastes between stories, and everyone left with chocolate-smudged smiles. Desserts like this weave quick memories: they look elegant, feel indulgent, and invite a playful twist every time you make them.
I’m a home cook who started in a bustling Atlanta catering kitchen and carried those lessons home. After 16 years working events and running a small catering operation, I shifted my focus to sharing simple, crowd-pleasing recipes that fit family life. As a mom of two and a wife for more than two decades, my kitchen sits at the center of our days. I learned how to scale recipes up and down, how to adapt for picky eaters, and how to add flavor twists that make guests say, “Tell me how you did that.” That spirit practical, warm, and a little adventurous guides everything I share. I love following a recipe to the letter when needed, but I also encourage adding your own touches: a citrus note, a crunchy sprinkle, or a quick boozy splash. This recipe reflects those strengths: it comes from catering-tested techniques and translates beautifully to a cozy family table. Whether you’re hosting a party or treating your kids on a school night, these cups are a small gesture that brings people together.
INTRODUCTION
Why this recipe works
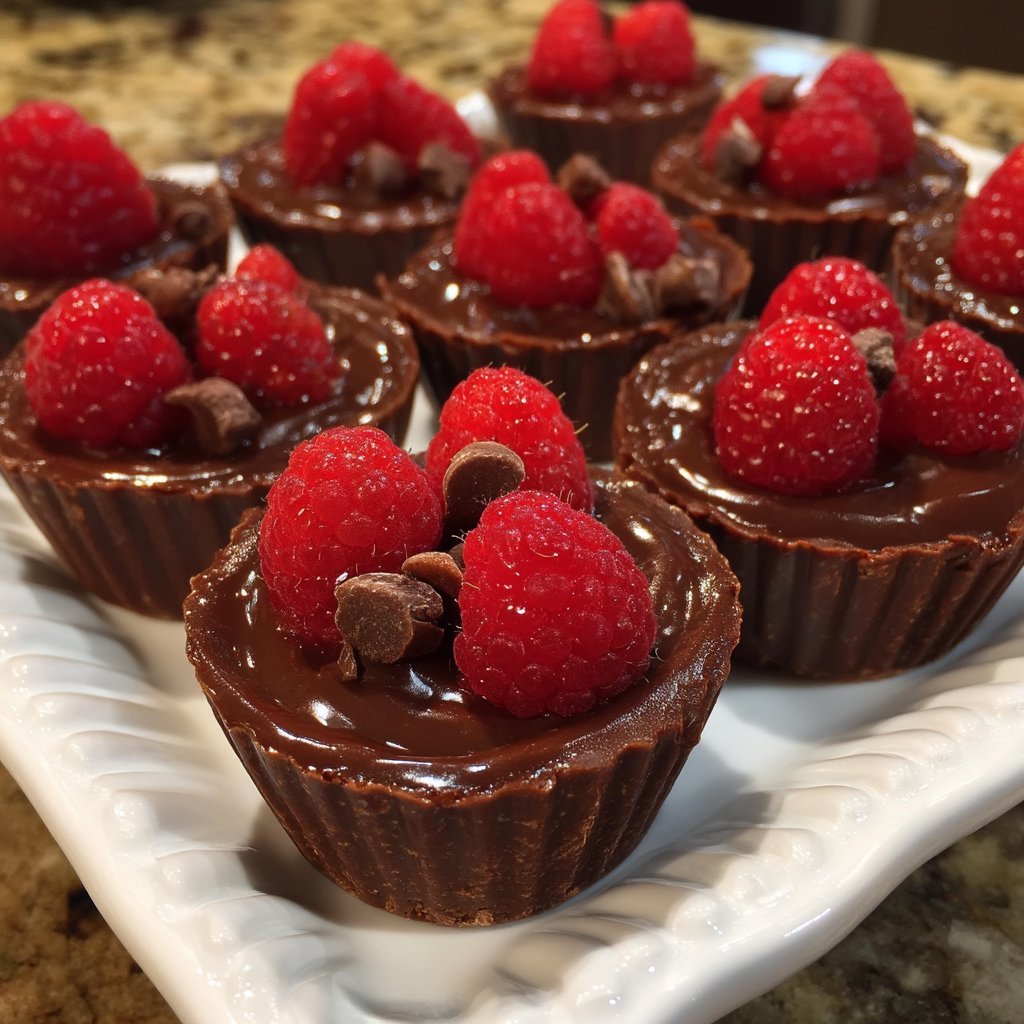
This dessert blends two delights: a crisp chocolate shell that snaps when you bite it and a cloudlike mousse that melts on the tongue. The contrast in textures makes every forkful interesting, and when you serve them in individual cups, they feel special without much fuss. The method draws on basic catering principles make components ahead, finish just before serving, and present simply but thoughtfully which keeps stress low while maximizing wow factor. I design recipes to scale, and these cups work whether you make a few for family or a tray for guests.
Chocolate forms the structure here. Tempering isn’t required for a great shell; gently melted chocolate poured into molds and chilled sets into a stable cup that handles mousse well. The mousse itself uses whipped cream folded into a chocolate–egg base, which gives it lift and a silky finish without being overly heavy. That balance matters: you want richness without the dessert sitting like a brick after dinner. Fresh raspberries add acidity and bright color, cutting through the chocolate and adding a refreshing pop. For allergy-conscious hosts, the recipe adapts: use pasteurized eggs or egg-free mousse bases, and swap dairy for stable plant creams if necessary.
Timing-wise, the recipe separates well. Make the cups a day ahead, store them carefully, and fill shortly before serving so the shell stays crisp. The mousse can be made earlier the same day. These steps mimic what I used to do catering: do the detail work ahead, and enjoy the gathering. Most importantly, the recipe invites creativity. Add a little orange zest to the mousse, sprinkle toasted nuts on top, or drizzle salted caramel for an adult twist. That flexibility makes this dish a dependable favorite for both casual family nights and more formal entertaining.
How to prepare Chocolate Mousse Cups
This is a straightforward plan that respects technique without demanding advanced skills. Start by melting chocolate and forming the cup shells. Use a small scoop or mold for uniform shapes; consistency matters when you plate a tray. While the shells chill, prepare a stable mousse by tempering melted chocolate into egg yolk and sugar, then folding in softly whipped cream. Chill the mousse briefly so it pipes cleanly. Assembly takes just minutes: pipe the mousse into shells, top with fruit, and let the flavors settle for an hour if you have the time.
From a practical standpoint, keep tools and temperatures in mind. Use a glass or metal bowl for melting chocolate over a gentle double boiler or short bursts in the microwave, stirring frequently. Avoid overheating chocolate; pull it off the heat when most of the pieces are melted and stir until smooth. When whipping cream, stop at soft to medium peaks so it folds without deflating. The egg yolk and sugar stage should be light and slightly thickened; this ensures the mousse gains structure and a glossy mouthfeel.
If you’re nervous about raw eggs, choose pasteurized eggs or prepare a custard-style mousse by gently heating the egg mixture while whisking, then cooling before adding chocolate and whipped cream. This adds an extra step but increases food-safety confidence for family gatherings with little ones or pregnant guests. Keep in mind that you can make the chocolate cups and mousse the day before; store the shells dry and airtight, and keep mousse chilled. Fifteen to thirty minutes before serving, assemble, garnish, and bring them to the table the presentation always feels celebratory.
Ingredients
- Chocolate for cups
- Heavy cream
- Eggs
- Sugar
- Vanilla extract
- Raspberries

Instructions
- Melt chocolate and cool it slightly.
- Mold melted chocolate into cup shapes and let them set.
- Whip heavy cream until soft peaks form.
- Mix egg yolks with sugar until creamy, then add melted chocolate and vanilla.
- Gently fold in whipped cream.
- Pipe the mousse into chocolate cups.
- Top with fresh raspberries before serving.
Serving ideas
Serving small desserts like these invites playful presentation. Arrange the cups on a platter with a scattering of fresh raspberries and a few mint sprigs for color and a fresh aroma. If you host a buffet, place the cups inside shallow bowls of crushed ice to keep them cool and prevent sliding. For an intimate dinner, set one cup at each place with a tiny spoon and a napkin folded underneath the look is elegant but relaxed, ideal for family meals that feel a touch special. Kids love the individual portions; let them choose a topping station with raspberries, crushed cookies, or toasted coconut to personalize their cups.
Pairings matter. Serve these cups after a citrus-forward main or a salad with vinaigrette; the richness of the mousse complements bright acidity on the palate. If you want an adult beverage pairing, a glass of tawny port, a rich tawny sherry, or a bold espresso works beautifully. For brunch or a lighter gathering, offer smaller portions with a dollop of lightly sweetened yogurt or a few berries to keep the dessert balanced. Presentation-wise, sprinkle a tiny pinch of flaky sea salt on some cups for a sophisticated contrast the salt plays up the chocolate’s depth without overwhelming children’s palates.
When plating for guests, aim for variety. Offer a trio: one plain mousse cup, one with orange zest, and one with a crunchy nut topping. This makes the dessert feel like a tasting and gives family members a chance to try different flavor combinations. Ultimately, serving is where your personal twist shines keep the plating simple, add one thoughtful garnish, and let the dessert do the talking.
Storage tips
Planning ahead makes entertaining smoother. Store the filled cups in an airtight container in the refrigerator for up to two days; the mousse keeps its texture best when chilled but served within that window. If you make chocolate shells in advance, store them in a cool, dry place in a single layer or separated by parchment to avoid sticking; they stay crisp for several days. Avoid stacking shells while storing because that can break the thin edges. If humidity is a concern, wrap shells lightly and add a small packet of dry rice in the container (not touching the food) to help absorb moisture.
If you need to freeze for longer storage, freeze the mousse in a separate airtight container first, then thaw in the refrigerator overnight before piping into chocolate cups. Freezing can slightly alter the texture of whipped cream, so this method works best when you rewhip a small amount of fresh cream and fold it back in after thawing for extra lift. Once assembled, avoid freezing the filled cups; chocolate shells can sweat and soften upon thawing, and raspberries lose their bright texture.
When transporting, keep the cups steady in a shallow box lined with non-slip material. If filling the shells at the venue, transport the shells and mousse separately and assemble on-site. Always let guests know if you use raw eggs and offer alternatives if anyone has dietary restrictions. With a little forethought, you’ll keep both texture and flavor at their best.
Emma’s Kitchen Tips
From my catering years, timing and texture were everything. First, temperature control: chocolate sets best when slightly warm and poured into cool molds; the contrast encourages a clean release. When whipping cream, err on the side of slightly under-whipping; it folds smoother and yields a silkier mousse. Over-whipped cream can create pockets of air that collapse after piping. Use a rubber spatula and perform gentle, deliberate folds to preserve volume. If you need to speed things up, chill your mixing bowl and beaters for five minutes before whipping the cream.
Second, consistency counts. Use a piping bag with a medium tip for even portions consistent sizes look professional and prevent overfilling, which can stress the chocolate shell. For adults, fold in a tablespoon of espresso or a splash of liqueur to deepen flavor. For child-friendly versions, add a teaspoon of vanilla extract and a tiny pinch of cinnamon for warmth.
Third, play with textures. Add a thin layer of crushed biscuit or praline at the bottom of each chocolate cup before piping mousse to give a surprising crunch. Toasted nuts add depth; freeze-dried raspberries provide a bright, crisp finish. Finally, always taste and adjust: if the mousse tastes too flat after cooling, a pinch of salt or a teaspoon of vanilla can brighten it. These small adjustments turn a good dessert into a memorable one.
Make it your own
This recipe thrives on customization. For a citrusy twist, fold in finely grated orange zest to the chocolate mixture before folding in cream. For a nutty version, sprinkle a thin layer of finely chopped toasted hazelnuts into each cup before filling. You can also introduce layers: a thin smear of raspberry jam or salted caramel between the shell and mousse adds complexity. If you prefer a lighter flavor profile, substitute part of the chocolate with white chocolate and add lemon zest and a few blueberries on top.
Dietary swaps work too. For an egg-free mousse, use whipped aquafaba (the liquid from canned chickpeas) whipped to soft peaks and folded into melted chocolate; it mimics the lightness of traditional mousse surprisingly well. For dairy-free versions, choose a stable coconut cream whipped to medium peaks, and use high-quality dark chocolate that doesn’t contain milk solids. If you’re making a large batch for a party, consider offering two variants one classic chocolate and one with a bold flavor like chili or orange so guests can pick their favorite.
One of my favorite twists: add a sprinkle of crushed candied bacon for a sweet-salty combo at adult gatherings. Another easy change is a dusting of cocoa powder and a small shard of tempered chocolate as a garnish for a café-style presentation. These variations let you tailor the dessert to the occasion while keeping the core technique intact.
Frequently asked questions
Q: Are raw eggs safe in this mousse?
A: You can use pasteurized eggs to reduce risk; they provide the classic mousse texture without worry. If pasteurized eggs are unavailable, consider making a cooked custard base by gently heating the egg yolk and sugar mixture to 160°F while whisking, then cooling before adding chocolate and whipped cream. For an egg-free approach, whipped aquafaba creates a surprisingly light foam that works well when folded into melted chocolate.
Q: How far ahead can I make the chocolate cups and mousse?
A: Make chocolate cups up to 48 hours ahead and store them in a cool, dry place in an airtight container separated by parchment. Make mousse a day ahead and keep it refrigerated; it will maintain texture for 24–48 hours. For best presentation, fill the cups within a few hours of serving so the shells remain crisp and the raspberries stay fresh.
Q: Can I use different fruits or toppings?
A: Absolutely. Fresh berries like strawberries or blueberries work beautifully, as do candied orange peel or crushed toasted nuts. For a decadent adult version, top with a small spoonful of salted caramel or a dusting of espresso powder. Choose toppings that contrast the mousse’s creaminess with brightness or crunch.
Conclusion
If you’d like an alternative recipe reference or more step-by-step photos for Chocolate Mousse Cups, I recommend checking this detailed guide: Chocolate Mousse Cups – Cookie Dough and Oven Mitt.
Print
Chocolate Mousse Cups
- Total Time: 45 minutes
- Yield: 4 servings
- Diet: Vegetarian
Description
Delicious chocolate cups filled with silky mousse, perfect for family gatherings or special occasions.
Ingredients
- Chocolate for cups
- Heavy cream
- Eggs
- Sugar
- Vanilla extract
- Fresh raspberries
Instructions
- Melt chocolate and cool it slightly.
- Mold melted chocolate into cup shapes and let them set.
- Whip heavy cream until soft peaks form.
- Mix egg yolks with sugar until creamy, then add melted chocolate and vanilla.
- Gently fold in whipped cream.
- Pipe the mousse into chocolate cups.
- Top with fresh raspberries before serving.
Notes
For allergy-conscious hosts, substitute with pasteurized eggs or dairy-free options.
- Prep Time: 15 minutes
- Cook Time: 30 minutes
- Category: Dessert
- Method: Chilling and Assembling
- Cuisine: French