
I still remember pulling a warm pan of Cherry Pie Bars from the oven the first time I tried this shortcut to a classic pie the sweet cherry filling bubbling under a buttery, crumbly topping filled the kitchen with a smell that made the whole house lean in. It’s the kind of dessert that turns a simple weeknight into a cozy family memory, the one my kids ask for on rainy afternoons and that neighbors expect when I bring a plate to a block party.
I’m a former caterer from Atlanta, and food has been the center of my life for more than 16 years. I started out running a small catering business, learning how to feed a crowd and keep flavors simple but memorable. Over the years I transitioned to writing full-time for Recipes Vibes, all while raising two busy kids and keeping my kitchen the heart of our home.
My style mixes tried-and-true techniques with room for playful changes I love following recipes, but I always encourage adding a personal twist that makes the dish yours. These Cherry Pie Bars are a perfect example: reliable, fast, and ready to be customized with your favorite add-ins. They’re a go-to when I want to serve something nostalgic without the fuss of a full pie, and they shine at potlucks, lunches, and after-school snack time.
Table of Contents
Table of Contents
Why this recipe stands out
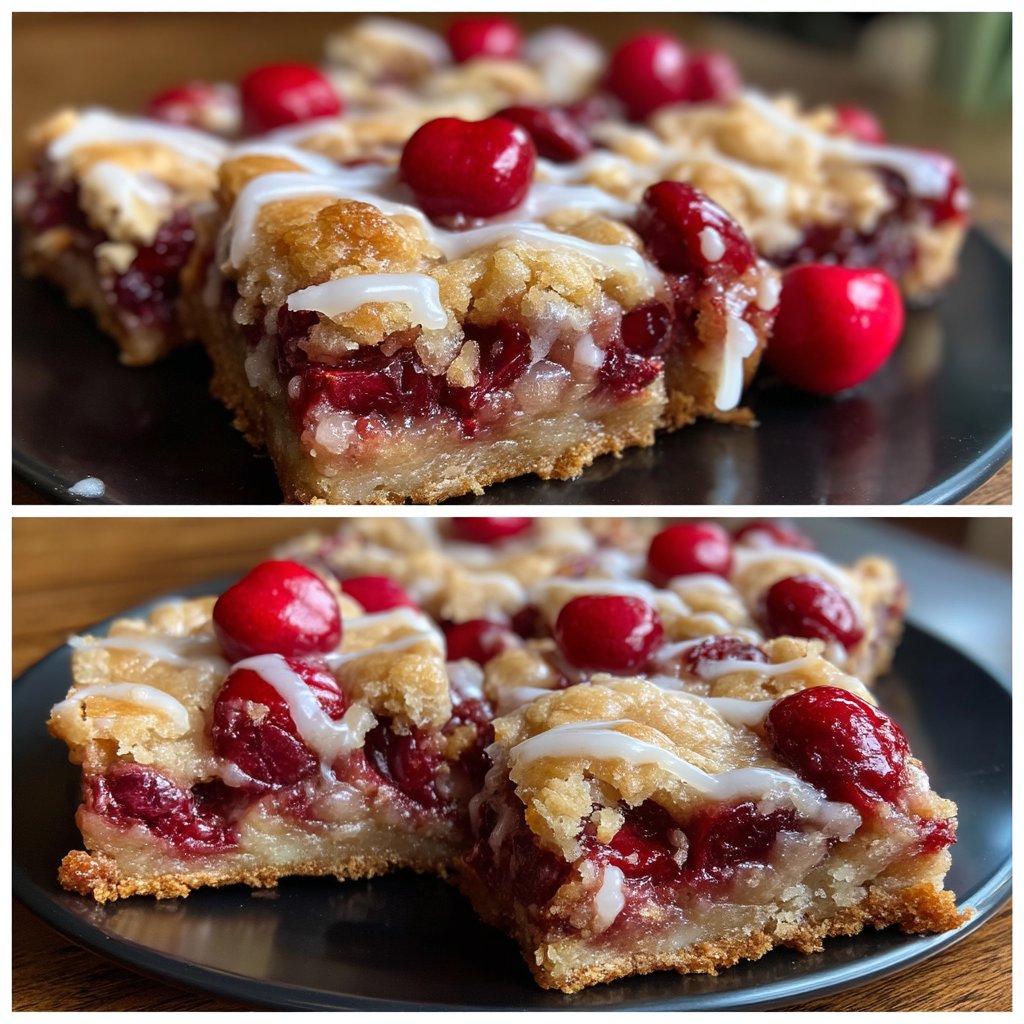
Cherry Pie Bars capture the best parts of a cherry pie but in a faster, handier form. Because you sandwich cherry pie filling between a buttery shortbread-like crust and a crumbly topping, each bite gives you that classic balance: tart-sweet cherries, rich buttery dough, and just enough sugary crumble to make it feel like a treat. For busy families and hosts, Cherry Pie Bars save time without sacrificing flavor. They bake in a single pan, cut into tidy squares, and travel well which is why I used them so often in catering when I needed something delicious, portable, and crowd-pleasing.
The structure of these bars also makes them forgiving. The crust is easy to press into a pan, and the crumb topping can be adjusted if you want more crunch or a softer finish. If you like brighter cherry flavor, a splash of lemon zest or a sprinkle of cinnamon in the filling amps things up without adding steps. Because I’ve baked these dozens of times for clients and my own family, I can tell you how to get them golden without overbaking and how to avoid a soggy bottom two common worries when people try Cherry Pie Bars at home. They’re an excellent bridge between a homemade pie and a quick, satisfying dessert that everyone recognizes and loves.
How this recipe comes together
Making Cherry Pie Bars at home feels almost like building a simple sandwich: base, filling, and top. The dough comes together quickly just flour, butter, and sugar and you press half into the pan to create a sturdy shortbread base. The cherry pie filling goes on next, ideally spread evenly so every square gets plenty of fruity goodness. The remaining dough turns into crumbs that you scatter over the cherries; as the bars bake, that topping browns and crisps, finishing the texture contrast. Because the technique is straightforward, it’s a wonderful beginner-friendly dessert that still delivers a homemade quality.
From my catering days in Atlanta, I learned pacing: prepare the dough and have it chill slightly if your kitchen is warm, then press it and fill the pan so you’re not fiddling while the oven heats. The filling is often store-bought pie filling for convenience, but if you prefer homemade cherry filling, the bars benefit from a slightly thicker filling to prevent runniness.
Once out of the oven, these Cherry Pie Bars need a short cooling period so the filling sets and you can cut neat squares. A light vanilla glaze or a dusting of powdered sugar is optional, but it adds a lovely finishing touch that draws a crowd. Because they store well, you can bake them a day ahead, which is a catering trick I still use for stress-free gatherings.
Ingredients
- 2 cups all-purpose flour
- 1 cup unsalted butter, softened
- 1 cup granulated sugar
- 2 cups cherry pie filling
- 1 teaspoon vanilla extract
Instructions
- Preheat your oven to 350°F (175°C).
- In a mixing bowl, cream together the butter and sugar until light and fluffy.
- Gradually add in the flour and mix until thoroughly combined to form the crust.
- Press half of the dough mixture into the bottom of a greased baking pan.
- Spread the cherry pie filling evenly over the crust.
- Crumble the remaining dough mixture on top of the cherry filling.
- Bake for 30-35 minutes, or until the top is lightly golden brown.
- Once cooled, drizzle your vanilla glaze over the top and allow it to set before slicing.
Best ways to enjoy it
Cherry Pie Bars are versatile in how you serve them. Warm from the oven, they pair beautifully with a scoop of vanilla ice cream the cool cream balances the warm, slightly tart cherries and buttery crumbs. For a lighter finish, serve room-temperature squares with a dollop of whipped cream or a spoonful of Greek yogurt sweetened with honey. When I bring Cherry Pie Bars to potlucks, I often cut smaller bite-sized squares so guests can enjoy more than one flavor profile if there are other desserts on the table; that way they’re easy to pop into the mouth and pair with coffee or tea.
For a brunch spread, consider serving bars alongside fruit salad and strong coffee, or plate them as part of a dessert trio with a chocolatey option and a citrus tart the bright cherry flavor contrasts nicely with heavier sweets. If you want to dress them up for a holiday table, glaze the bars with a vanilla-citrus icing and garnish with finely chopped toasted almonds or a few fresh cherries on top.
For kids’ lunchboxes or after-school snacks, skip the glaze and pack a single square in parchment paper for a tidy, sweet treat. Cherry Pie Bars are as relaxed or as dressed-up as you need them to be, which is why they remain a staple in my home and in many catering orders.
How to store it properly
Storing Cherry Pie Bars correctly keeps them tasting fresh and keeps the texture just right. At room temperature, place bars in an airtight container and layer parchment between stacks to prevent sticking; they’ll stay good for two days this way. If you want them to last longer, store in the refrigerator for up to a week the butter in the crust will firm up, which makes them easier to slice cleanly. Refrigeration is especially helpful if you’ve added a glaze or if your kitchen is warm.
For longer storage, freeze the bars. Cut them into squares and place them on a baking sheet to flash-freeze for an hour, then transfer to a freezer bag or container with parchment between layers. Frozen Cherry Pie Bars will keep well for up to three months. When you’re ready to serve, thaw overnight in the fridge or at room temperature for a couple of hours; you can warm them briefly in a low oven to revive the crispness of the topping.
One catering secret I rely on is labeling containers with the date it saves time and guesswork when prepping for events. Proper storage keeps household favorites like Cherry Pie Bars ready whenever you need a quick dessert or a thoughtful treat to bring along.
My catering secrets for this dish
From years of catering in Atlanta, I carried a few reliable tricks to make Cherry Pie Bars dependable for crowds. First, use room-temperature butter it creams with sugar more evenly, producing that tender, shortbread-like crust. Second, don’t overwork the dough; mix just until combined to keep the crumbly texture. Third, press the base firmly and evenly into the pan so it bakes uniformly; a pastry tamper or the bottom of a measuring cup works great for this.
If you’re serving many people, I recommend baking in a half-sheet pan for larger batches and adjusting the bake time slightly. For a brighter flavor, stir a teaspoon of lemon zest into the filling before spreading. When transporting, stack bars in a shallow, lidded box lined with parchment to protect the crumb topping. For airier catering presentation, dust with powdered sugar just before serving or drizzle glaze right before guests arrive. These small steps help Cherry Pie Bars look freshly made even after a busy day of prep and travel, and they’ve been key to keeping clients happy and plates empty at events.
Make it your own
One of the best parts about Cherry Pie Bars is how easy they are to personalize. Swap in a mixed-berry filling for a tangy variation, or fold chopped dark chocolate into the crumbs for an adult twist. For extra texture, stir toasted chopped pecans or almonds into the topping before crumbling it over the filling. If you want to cut sugar, try a sugar substitute suited for baking and use a low-sugar cherry filling; just taste and adjust to maintain balance.
For a seasonal spin, add a sprinkle of warm spices cinnamon, nutmeg, or allspice into the crust or topping. If you love a lattice effect, reserve a portion of the dough and cut it into strips to weave lightly over the cherries before crumbling the rest on top. You can also turn these into mini tarts by pressing the base into muffin tins and adding less crumb on top for bite-sized Cherry Pie Bars. Don’t be afraid to experiment I often tweak quantities or add a pinch of sea salt to the topping to make the flavors pop. Making the bars your own keeps the recipe fresh and fun for family dinners and special occasions.

Frequently asked questions
Q: Can I use fresh cherries instead of cherry pie filling?
A: Yes, you can use fresh cherries, but they need a bit of help to thicken and sweeten. Pit and halve the cherries, then simmer them with a little sugar and a teaspoon of cornstarch dissolved in cold water until glossy and slightly thickened. Cool the mixture completely before spreading it over the crust to prevent a runny filling. Using fresh cherries gives the bars a brighter, fresher flavor, but the pre-made cherry pie filling saves time and still tastes fantastic.
Q: How do I avoid a soggy bottom?
A: A few tips prevent a soggy base: press the crust firmly and evenly, and don’t overload the filling two cups works well for most 8×8 or 9×9 pans. If you’re using homemade filling, make sure it’s thickened and cooled before spreading. Bake the bars until the top is lightly golden; underbaking can leave excess moisture. Finally, allow the bars to cool for at least 30–45 minutes before slicing so the filling sets; chilling briefly in the fridge helps if you want cleaner slices.
Q: Can I make these ahead for a party?
A: Absolutely. Cherry Pie Bars are excellent for make-ahead entertaining. Bake them a day in advance, let them cool completely, then store in an airtight container at room temperature for two days or refrigerate for up to a week. If you need to make them further ahead, freeze finished squares; thaw in the fridge overnight and warm gently before serving. Preparing them ahead frees up oven space and lets flavors meld, which often improves the overall taste.
Conclusion
If you love the familiar comfort of cherry pie but need something faster and easier to portion, Cherry Pie Bars are a smart, soulful choice that keeps well and invites creativity. For a take on this classic that’s been tested and loved, you can compare variations and tips with a trusted recipe like The Country Cook’s Cherry Pie Bars recipe, then make it your own with the small twists that suit your family and kitchen.
Print
Cherry Pie Bars
- Total Time: 45 minutes
- Yield: 12 servings
- Diet: Vegetarian
Description
Easy-to-make Cherry Pie Bars with a sweet cherry filling sandwiched between buttery, crumbly layers.
Ingredients
- 2 cups all-purpose flour
- 1 cup unsalted butter, softened
- 1 cup granulated sugar
- 2 cups cherry pie filling
- 1 teaspoon vanilla extract
Instructions
- Preheat your oven to 350°F (175°C).
- In a mixing bowl, cream together the butter and sugar until light and fluffy.
- Gradually add in the flour and mix until thoroughly combined to form the crust.
- Press half of the dough mixture into the bottom of a greased baking pan.
- Spread the cherry pie filling evenly over the crust.
- Crumble the remaining dough mixture on top of the cherry filling.
- Bake for 30-35 minutes, or until the top is lightly golden brown.
- Once cooled, drizzle your vanilla glaze over the top and allow it to set before slicing.
Notes
These bars can be made ahead of time and stored. They also pair well with vanilla ice cream or whipped cream.
- Prep Time: 15 minutes
- Cook Time: 30 minutes
- Category: Dessert
- Method: Baking
- Cuisine: American